Kotlin Native and Raspberry Pi pt. 2: SSD1306 display
Last week, we started building a Kotlin Native application running on Raspberry Pi. The first part focused on the hardware part and preparing a Gradle build script. Today we are ready to write some actual code. Our goal is programming a monochrome display with SSD1306 chipset to show simple graphics and text. We will learn more about using C libraries in Kotlin, and do some bitwise operations. Are you ready?
tl;dr;
SSD1306 chipset provides a 1KB memory buffer for 128×64 pixel monochromatic screen. We transfer the data through SPI, and use additional D/C pin to tell whether the next byte is the screen data or the command.
SSD1306 chipset
In this article, we are going to use Waveshare 0.96″ OLED display with 128×64 screen. It uses SSD1306 chipset that handles the entire display logic. The screen provides two colors: blue and yellow. We cannot, however, we cannot set pixel colors directly. Instead, 48 horizontal lines use blue diodes, and the remaining 16 – yellow. This means that we need just a single bit to control every point, and the entire screen content fits in a 1KB memory buffer.
By default, the chipset uses SPI for communicating with host. We can, however, reconfigure it to use I2C interface through soldering. It also uses two custom pins that are not a part of SPI standard:
- RESET pin: allows resetting the memory and configuration,
- D/C pin: switches between command and data transfer modes.
In our setup, we let Raspberry Pi handle SPI communication through dedicated GPIO pins. We will, however, operate RESET and D/C pins on our own.
Memory organization of SSD1306 display
The key thing to display something on the screen is understanding the organization of the chipset memory. Let’s take a look at it from the bottom to top:
- 1 bit controls a single screen pixel
- 1 byte controls 8 points in a single vertical line
- the memory is divided into 8 pages of 128 columns
There is no random access to single bytes. Instead, we write a single byte through SPI in data mode. Then, the SSD1306 chipset computes its “location” from two counters: page and column counter. The way how it increments those counters, depends on the configured addressing mode. In addition, we can control screen orientation. The graphics below shows the available modes.
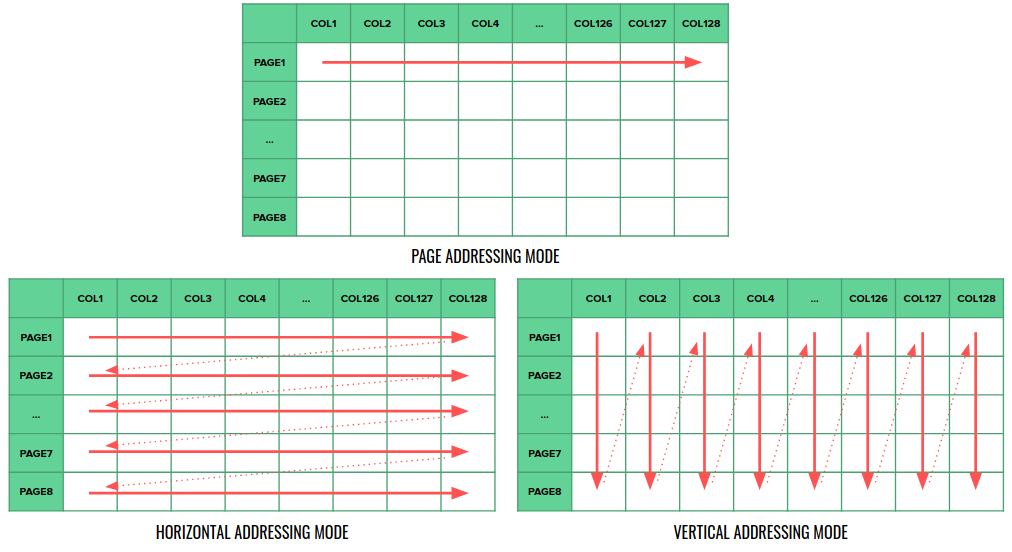
- PAGE: after filling all columns at the current page, the counter resets to the beginning of the page
- HORIZONTAL: filling first 8 horizontal lines in page 1, then advancing to page 2, etc.
- VERTICAL: fill all 64 pixels of a single column, then advance to the next column, etc.
In short…
When preparing a bitmap or a font map, remember that a single byte represents 8 points in a vertical line. The screen position of the next saved byte depends on the page addressing mode.
Programming displays with SSD1306 chipset
To control our display, we will use bcm2835 library. We have already added it to our Kotlin Native application in the previous part of this article. Now it’s time to learn how it works.
Sample code
Find a complete example on Github: zone84-examples/rpi-display-native-demo
Configuring Raspberry PI to use SPI
Before we start, let’s make sure that SPI is enabled in Raspberry Pi configuration. Assuming that you use the official RaspberryPI OS, type the following command in the console:
sudo raspi-configThen, go to Interfacing Options > SPI and select “Enable the SPI interface” and “Automatically load the SPI kernel module“.
Warning
All programs that want to access GPIO or SPI pins, need root privileges. Run your executable with sudo!
Initializing SPI
In the previous article, we said that SPI can control several devices that share data lines. In addition, each device contains its own activation line. We select the active device by sending a signal to that line. BCM2835 library already contains the necessary functions for SPI that do much of the work for us:
class SpiConnector(val device: bcm2835SPIChipSelect, val logger: TinyLogger) {
    fun use(action: (SpiOperations) -> Unit) {
        init()
        try {
            action(DefaultSpiOperations())
        } finally {
            done()
        }
    }

    private fun init() {
        if (bcm2835_init() != 1) {
            throw HardwareException("Unable to initialize BCM2835. Are you running as root?")
        }
        if (bcm2835_spi_begin() != 1) {
            throw HardwareException("Unable to initialize SPI in BCM2835.")
        }

        bcm2835_spi_setChipSelectPolarity(device.toUByte(), 0)
        bcm2835_spi_set_speed_hz(20000000)
        bcm2835_spi_setDataMode(BCM2835_SPI_MODE2.toUByte())
        bcm2835_spi_chipSelect(device.toUByte())
        logger.info {  "BCM2835 SPI initialized..." }
    }

    private fun done() {
        bcm2835_spi_end()
        logger.info { "BCM2835 SPI finished" }
    }
}
The first thing is initializing BCM2835 library itself. Then, we enable SPI. Those functions fail, if we either don’t run our application as root or we forget to enable SPI in the configuration. bcm2835_spi_setChipSelectPolarity() specifies which signal (0 or 1) is the activation signal. We also select the transmission speed, and finally – activate the device. We must also remember to finalize SPI at the end, even in case of error. For this reason, we use try … finally block. All the code that uses SPI should be in the lambda passed to the use() function.
We also need to wrap several functions from BCM2835 library to better support Kotlin data structures:
class SpiConnector(val device: bcm2835SPIChipSelect, val logger: TinyLogger) {
    // ...

    inner class DefaultSpiOperations : SpiOperations {
        private val buffer = ByteArray(1)

        override fun writeByte(byte: Byte) {
            buffer[0] = byte
            bcm2835_spi_writenb_hacked(buffer.toCValues(), 1)
        }

        override fun writeByte(byte: UByte) {
            buffer[0] = byte.toByte()
            bcm2835_spi_writenb_hacked(buffer.toCValues(), 1)
        }

        override fun writeBuffer(buffer: ByteArray) {
            bcm2835_spi_writenb_hacked(buffer.toCValues(), buffer.size.toUInt())
        }
    }
}

interface SpiOperations {
    fun writeByte(byte: Byte)
    fun writeByte(byte: UByte)
    fun writeBuffer(buffer: ByteArray)
}
Note that we use bcm2835_spi_writenb_hacked() function. We mentioned in the previous article that this is our custom variant of the original function. We need it, because the original uses unsigned char* type that Kotlin translates into String. However, we need a byte buffer, otherwise unicode operations would destroy all our data.
Sending commands and data
Writing screen content and SSD1306 chipset configuration is also quite simple. To do so, we send one of the two signals D/C pin and then – the actual data through SPI. If the signal on D/C pin is 0, the chipset reads the next byte as a command. If it is 1, it writes it to the screen memory and increments the counters. To reset the device, we provide the “0” signal on RESET pin for approximately 100 milliseconds. Below, you can find the listing for those functions:
class Ssd1306Driver(
    private val spi: SpiOperations,
    private val dcPin: RPiGPIOPin,
    private val resetPin: RPiGPIOPin
) {
    fun reset() {
        bcm2835_gpio_fsel(resetPin.toUByte(), BCM2835_GPIO_FSEL_OUTP.toUByte())
        bcm2835_gpio_fsel(dcPin.toUByte(), BCM2835_GPIO_FSEL_OUTP.toUByte())

        bcm2835_gpio_set(resetPin.toUByte())
        millisleep(millis = 10)
        bcm2835_gpio_clr(resetPin.toUByte())
        millisleep(millis = 100)
        bcm2835_gpio_set(resetPin.toUByte())
    }

    fun writeCommand(command: UByte) {
        bcm2835_gpio_clr(dcPin.toUByte())
        spi.writeByte(command)
    }

    fun writeData(data: ByteArray) {
        bcm2835_gpio_set(dcPin.toUByte())
        spi.writeBuffer(data)
    }
}
Let’s also expose some function wrappers to the most important configuration commands. They will help us rotating the screen and setting the proper addressing mode:
class Ssd1306Driver(
    private val spi: SpiOperations,
    private val dcPin: RPiGPIOPin,
    private val resetPin: RPiGPIOPin
) {
    private val staticConfigurationSequence = ubyteArrayOf(
        0xA6U, 0xA8U, 0x3FU, 0xD3U, 0x00U, 0xD5U, 0x80U, 0xD9U, 0xF1U, 0xDAU,
        0x12U, 0xDBU, 0x40U, 0x8DU, 0x14U, 0xA4U, 0xA6U
    )

    // ...

    fun commandEntireDisplayOn(enabled: Boolean) {
        if (enabled) {
            writeCommand(0xAFU)
        } else {
            writeCommand(0xAEU)
        }
    }

    fun commandResetPageCounter() {
        writeCommand(0x00U)
        writeCommand(0x10U)
    }

    fun commandSetInitialStartLine() {
        writeCommand(0x40U)
    }

    fun commandSetAddressingMode(addressingMode: Ssd1306AddressingMode) {
        writeCommand(0x20U)
        writeCommand(addressingMode.offset)
    }

    fun commandSetContrast(contrast: UByte) {
        writeCommand(0x81U)
        writeCommand(contrast)
    }

    fun commandSetOrientation(orientation: Orientation) {
        if (orientation == Orientation.NORTH) {
            writeCommand(0xA0U)
            writeCommand(0xC0U)
        } else {
            writeCommand(0xA1U)
            writeCommand(0xC8U)
        }
    }

    fun commandSendStaticInitializationSequence() {
        for (command in staticConfigurationSequence) {
            writeCommand(command)
        }
    }
}

enum class Ssd1306AddressingMode(val offset: UByte) {
    HORIZONTAL(0x00U),
    VERTICAL(0x01U),
    PAGE(0x02U)
}
Know more
You can find the full command reference in the manual for SSD1306 chipset.
Drawing graphics
At this point we should be able to show something on the screen. Let’s start with drawing a full-screen image. It’s very simple. All we need to do is sending 1024 bytes in DATA mode to the display, with the predefined content. There are a couple of converters that can translate an image file into a byte sequence. I used https://javl.github.io/image2cpp/ to convert the logo of this blog. It supports both horizontal and vertical addressing. I chose the first one and it must match the configuration of our device. In this mode, we fill the first 8 lines by writing 128 bytes. Then, the page counter increases and we fill the next 8 lines and so on. The full listing is shown below:
@OptIn(ExperimentalUnsignedTypes::class)
class Ssd1306Hal(
    private val driver: Ssd1306Driver,
    private val logger: TinyLogger
) : DisplayHal {
    override fun activateMode(mode: ScreenMode) {
        logger.debug { "Resetting SSD1306 display" }
        driver.reset()
        logger.info { "Enabling ${mode.drawMode}"}
        driver.commandEntireDisplayOn(false)
        driver.commandResetPageCounter()
        driver.commandSetInitialStartLine()
        when (mode.drawMode) {
            DrawMode.TEXT_MODE -> driver.commandSetAddressingMode(VERTICAL)
            DrawMode.GRAPHICS_MODE -> driver.commandSetAddressingMode(HORIZONTAL)
        }
        driver.commandSetContrast(0xCFU)
        driver.commandSetOrientation(mode.orientation)
        driver.commandSendStaticInitializationSequence()
        driver.commandEntireDisplayOn(true)
    }

    override fun drawFullScreenImage(buffer: ByteArray) {
        driver.writeData(buffer)
    }
}

private val logo = ubyteArrayOf(
    0x00U, 0x00U, 0x00U, 0x00U, 0x00U, 0x00U, 0x00U, 0x00U,
    0x00U, 0x00U, 0x00U, 0x00U, 0x00U, 0x00U, 0x00U, 0x00U,
    0x00U, 0x00U, 0x00U, 0x00U, 0x00U, 0x00U, 0x00U, 0x00U,
    0x00U, 0x00U, 0x00U, 0x00U, 0x00U, 0x00U, 0x00U, 0x00U,
    // ...
    0x00U, 0x00U, 0x00U, 0x00U, 0x00U, 0x00U, 0x00U, 0x00U,
    0x00U, 0x00U, 0x00U, 0x00U, 0x00U, 0x00U, 0x00U, 0x00U
).toByteArray()

fun main() {
    val logger = TinyLogger(LogLevel.DEBUG)
    val spiConnector = SpiConnector(BCM2835_SPI_CS0, logger)
    spiConnector.use {spi ->
        val hal = Ssd1306Hal.create(
            spi = spi,
            logger = logger,
            dcPin = RPI_BPLUS_GPIO_J8_16,
            resetPin = RPI_BPLUS_GPIO_J8_18
        )
        hal.activateMode(ScreenMode(Orientation.NORTH, DrawMode.GRAPHICS_MODE))
        sleep(1)
        hal.drawFullScreenImage(logo)
    }
}
Drawing text
Static images are nice, yet a bit useless. Usually we’d like to show some dynamic information and text. SSD1306 chipset has some useful hardware functions. However, we must write the actual text processing logic on our own. This includes encoding our custom bitmap font. In this article, we don’t run our application on a microcontroller with limited resources. We can afford creating a 1KB framebuffer in Raspberry Pi memory and then transfer it all to the display once everything is ready (to be honest, many microcontrollers can also afford that). The framebuffer technique is much more powerful, because we can print anything basically anywhere on the screen. It’s possible thanks to the free access to every byte of the buffer. When it comes to the hardware support, we would have to save everything in 1-byte blocks comprising 8 pixels. We couldn’t just print a text at position [17, 26], because we cannot read the previous content of the given byte to alter individual bits.
Let’s begin with a simple font resolver that encodes a simple, custom font of size 8×6 pixels:
class FontResolver {
    private val characters = mapOf<Char, UByteArray>(
        ' ' to ubyteArrayOf(0x00U, 0x00U, 0x00U, 0x00U, 0x00U, 0x00U),
        '.' to ubyteArrayOf(0x00U, 0x00U, 0x60U, 0x60U, 0x00U, 0x00U),
        '0' to ubyteArrayOf(0x00U, 0x3CU, 0x52U, 0x4AU, 0x3CU, 0x00U),
        '1' to ubyteArrayOf(0x00U, 0x08U, 0x44U, 0x7EU, 0x40U, 0x00U),
        '2' to ubyteArrayOf(0x00U, 0x64U, 0x52U, 0x4AU, 0x44U, 0x00U),
        '3' to ubyteArrayOf(0x00U, 0x22U, 0x42U, 0x4AU, 0x36U, 0x00U),
        '4' to ubyteArrayOf(0x00U, 0x1CU, 0x10U, 0x7EU, 0x10U, 0x00U),
        '5' to ubyteArrayOf(0x00U, 0x26U, 0x4AU, 0x4AU, 0x32U, 0x00U),
        // ...
    )

    fun pickSymbol(symbol: Char): UByteArray {
        return characters[symbol] ?: characters[' ']!!
    }
}
The next step is expanding our Ssd1306Hal class (“HAL” stands for “Hardware Abstraction Layer”). I started with creating a function for drawing a single byte in a desired place (our font size matches the size of the byte, so we don’t need to draw anything pixel by pixel). Then, I used it to build a function that draws a single character in the specified location. Finally, I created a function that prints out the entire text, and handles the column and line counters. For the framebuffer purpose, I chose the VERTICAL addressing mode. In this mode, the first 8 bytes of the buffer represent the content of the first column, and so on. It’s easier to use in the free-access mode:
@OptIn(ExperimentalUnsignedTypes::class)
class Ssd1306Hal(
private val driver: Ssd1306Driver,
private val logger: TinyLogger
) : DisplayHal {
// ...
override val textLineLength: Int
get() = 21
private var columnCounter: Int = 0
private var lineCounter: Int = 0
private val font: FontResolver = FontResolver()
private val framebuffer: UByteArray = UByteArray(1024)
fun drawByte(xLine: Int, yByte: Int, byte: UByte) {
if (xLine > 127 || yByte > 7) {
return
}
val location = xLine.shl(3) + yByte
framebuffer[location] = byte
}
fun drawChar(x: Int, y: Int, char: Char) {
if (x > 16 || y > 7) {
return
}
var line = x * 6
val symbol = font.pickSymbol(char)
for (byte in symbol) {
drawByte(line, y, byte)
line++
}
}
override fun write(text: String) {
for (symbol in text) {
if (columnCounter == textLineLength) {
columnCounter = 0
break
}
if (symbol == '\n') {
fillLine()
lineCounter++
break
} else {
drawChar(columnCounter, lineCounter, symbol)
}
columnCounter++
}
}
private fun fillLine() {
for (j in columnCounter until textLineLength) {
drawChar(j, lineCounter, ' ')
}
columnCounter = 0
}
override fun transfer() {
driver.writeData(framebuffer.toByteArray())
columnCounter = 0
lineCounter = 0
}
override fun clear() {
for (i in framebuffer.indices) {
framebuffer[i] = 0x00U
}
}
}
fun main() {
val logger = TinyLogger(LogLevel.DEBUG)
val spiConnector = SpiConnector(BCM2835_SPI_CS0, logger)
spiConnector.use {spi ->
val hal = Ssd1306Hal.create(
spi = spi,
logger = logger,
dcPin = RPI_BPLUS_GPIO_J8_16,
resetPin = RPI_BPLUS_GPIO_J8_18
)
hal.activateMode(ScreenMode(Orientation.NORTH, DrawMode.GRAPHICS_MODE))
sleep(1)
hal.drawFullScreenImage(logo)
sleep(3)
hal.activateMode(ScreenMode(Orientation.NORTH, DrawMode.TEXT_MODE))
hal.clear()
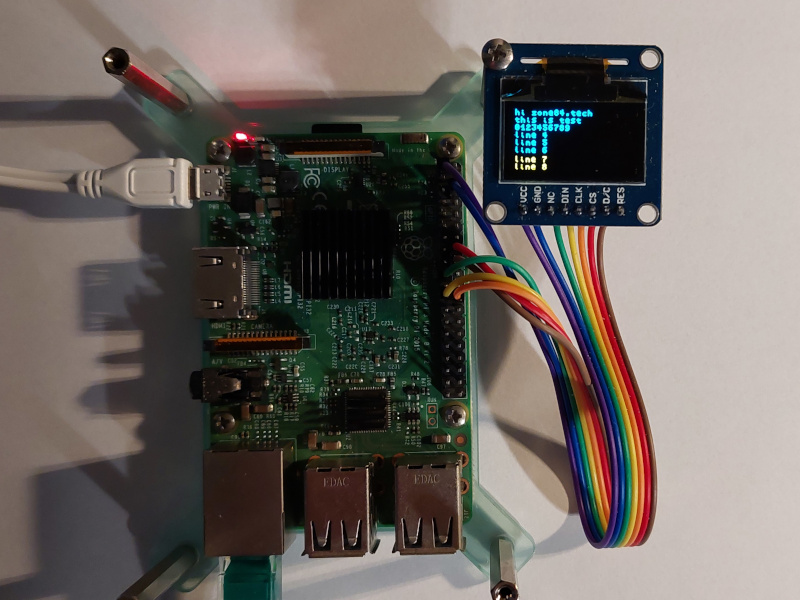
hal.write("hi zone84.tech\n")
hal.write("this is test\n")
hal.write("0123456789\n")
hal.write("line 4\n")
hal.write("line 5\n")
hal.write("line 6\n")
hal.write("line 7\n")
hal.write("line 8\n")
hal.transfer()
sleep(10)
}
}
Pro tip
The “Divide And Conquer” technique helps dealing with low-level code. Start with writing the most basic operations, then use them to build more complex ones, and so on. Note that we used this approach not only for text processing, but for the entire code organization (SPI connector, SSD1306 Driver, SSD1306 HAL).
Summary
The world of embedded devices is a good opportunity to learn how hardware works. It turns out that to display a simple “abc”, we need to write our own text processing functions and even create our own bitmap font. In this article we learned that once we have a proper C library binding, we can just code everything like in every other language. Kotlin has bitwise operations, unsinged types, support for byte arrays and a way for dealing with C pointers. But is it all that we need? In the next part, we will take a look at Kotlin libraries that support the native mode.
- Part 1: hardware setup and build script for Kotlin Native applications
- Part 3:
using Ktor Client to fetch data over HTTP and showing them on the displayoverview of Kotlin multiplatform projects
Sample code
Find a complete example on Github: zone84-examples/rpi-display-native-demo